
Webhooks
Deprecation notice: v1 events of webhooks will reach end of life and be removed by June 15th, 2025. Please transition to v2 webhook events which have the .v2 postfix in the webhook events documentation.
Introduction to Nectar Webhooks
Webhooks are how services notify each other of events. At their core they are just a POST request to a pre-determined endpoint. You normally use one endpoint per service, and that endpoint listens to all of the event types. For example, if you receive webhooks from Acme Inc., you can structure your URL like: https://www.example.com/acme/webhooks/.
The way to indicate that a webhook has been processed is by returning a 2xx (status code 200-299) response to the webhook message within a reasonable time-frame (15s). It's also important to disable CSRF protection for this endpoint if the framework you use enables them by default.
Another important aspect of handling webhooks is to verify the signature and timestamp when processing them. You can learn more about it in the webhook signature verification.
Webhook Events
We have a variety of event types that you can subscribe to. To view all events, check out our event catalog. For example, one such event is connection.created. Here is a sample payload for connection.created:
{
  "company": {
    "externalId": "269350a4-8595-42cc-96ee-bf047d093505",
    "id": "91c21c6b-5f3f-4d5f-9fb9-02530ef4b13c",
    "name": "Demo Company",
    "publicId": "cb78b85c-e68e-48de-a99e-e88862076823"
  },
  "created": "2024-09-06T00:15:43.073014117",
  "datasource": {
    "name": "Los Angeles Department of Water and Power"
  },
  "id": "a6c70a54-34e7-4277-80b0-412869ce087c",
  "sitesRelations": [{
    "accountIds": [0137746423],
    "datasourceTypes": ["ELECTRICITY"],
    "site": {
      "id": "67e72ddf-9e9c-42b6-81da-13c1130c691a",
      "name": "California Facility 1"
    }
  }],
  "status": "CONNECTED",
  "updated": "2024-09-06T00:15:43.073032737",
  "url": "https://ladwp.com"
}
Accessing the Webhook Portal
In order to start using webhooks with Nectar, you'll need to access your webhook portal by requesting a link from our API. The URL will be valid for 7 days. The only thing you need is your Nectar API Key, and you can start configuring your endpoints immediately.
Adding an Endpoint
In order to start listening to messages sent through Svix, you will need to configure your endpoints.
Adding an endpoint is as simple as providing a URL that you control and a list of event types that you want to listen to.
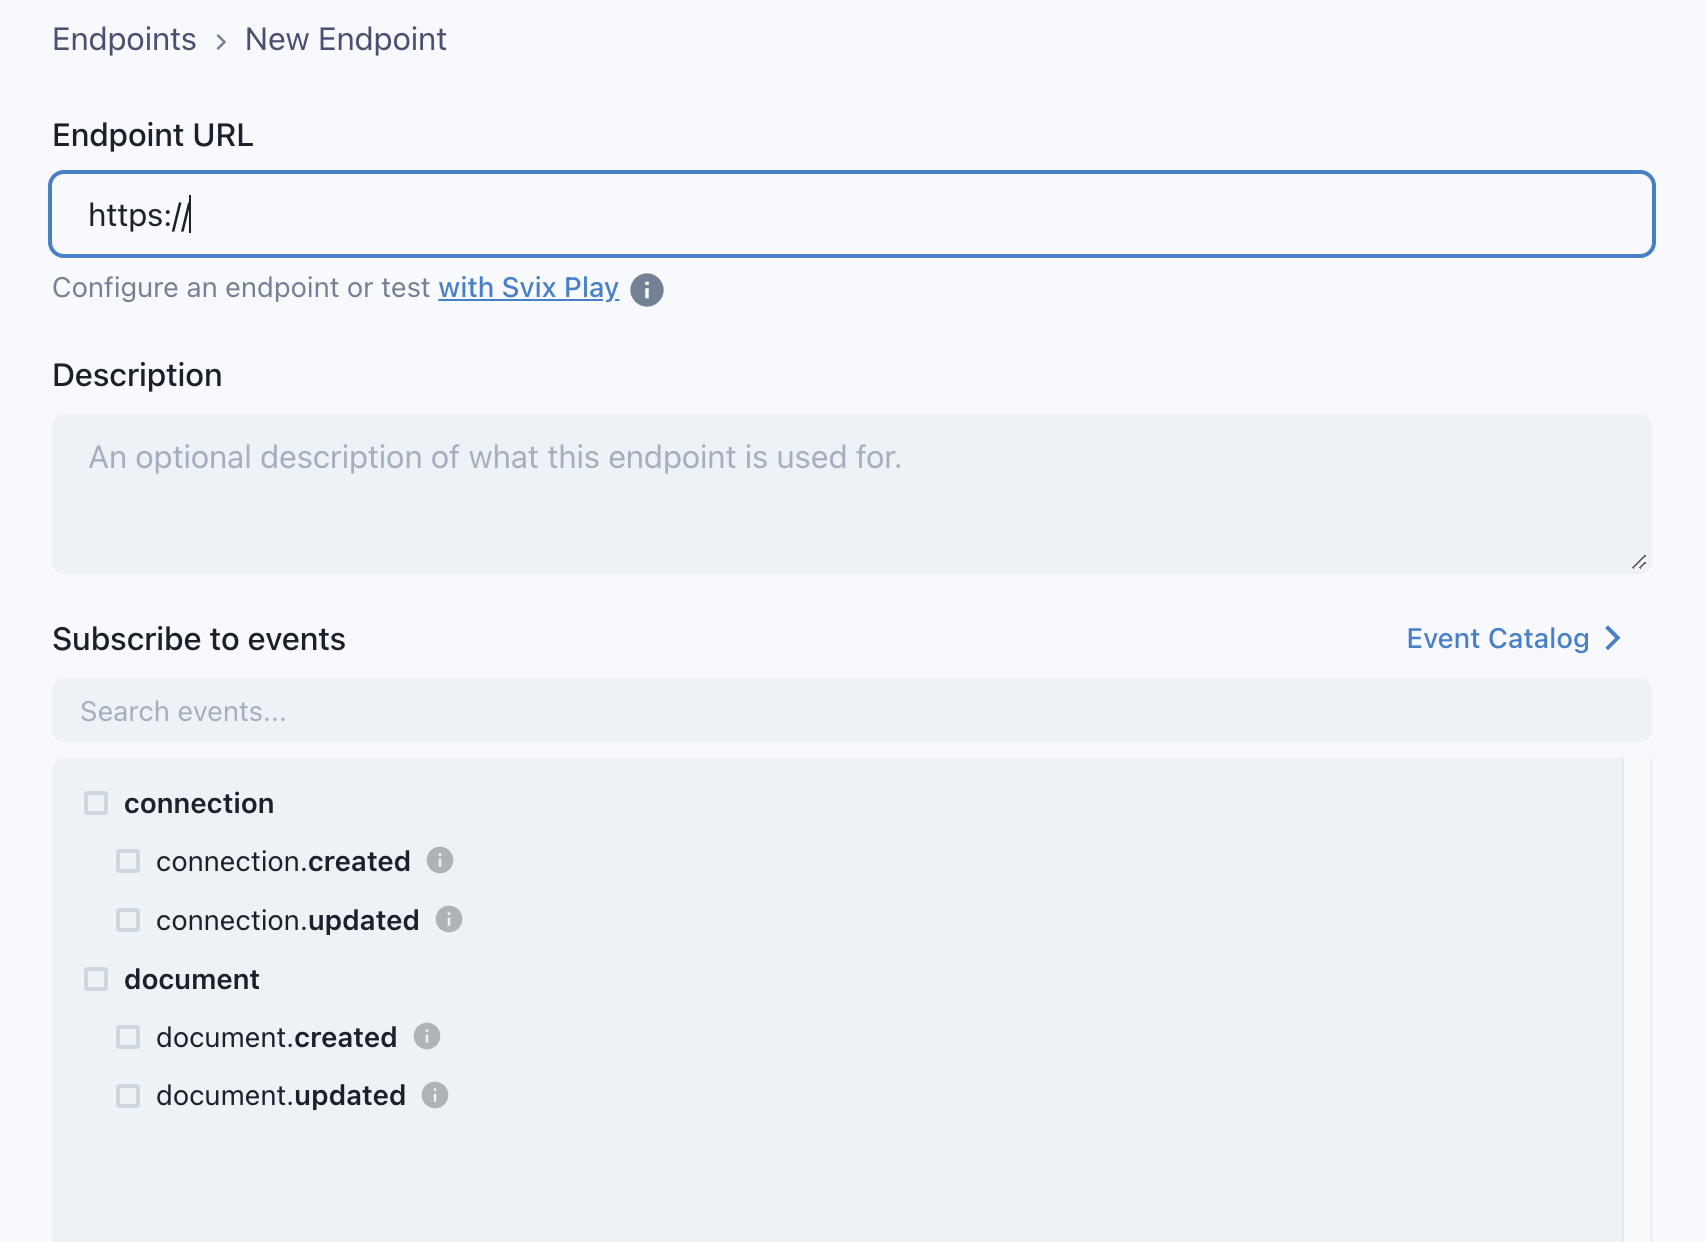
Helpful Tip!
If you don't have a URL or your service isn't quite ready to start receiving events just yet, just press the with Svix Play button to have a unique URL generated for you.
You'll be able to view and inspect all operational webhooks sent to your Svix Play URL, making it effortless to get started.
If you don't specify any event types, by default, your endpoint will receive all events, regardless of type. This can be helpful for getting started and for testing, but we recommend changing this to a subset later on to avoid receiving unexpected messages.
Testing your Endpoint
The easiest way to be more confident in your endpoint configuration is to start receiving events as quickly as possible.
That's why we have a "Testing" tab for you to send example events to your endpoint.
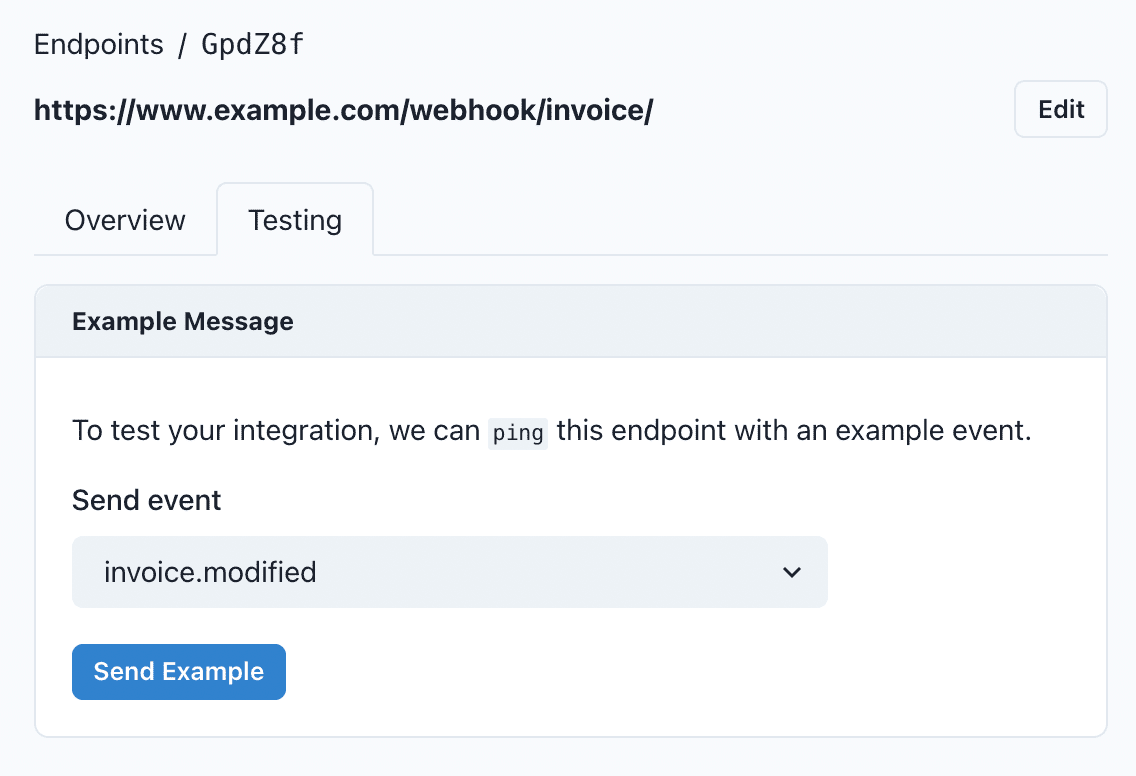
After sending an example event, you can click into the message to view the message payload, all of the message attempts, and whether it succeeded or failed.
Webhook Signature Verification
Webhook signatures is your way to verify that webhook messages are sent by us. For a more detailed explanation, check out this article on why you should verify webhooks.
How to verify webhooks with Svix Libraries
Our webhook partner Svix offers a set of useful libraries that make verifying webhooks very simple. Here is a an example using Javascript:
import { Webhook } from "svix";

const secret = "whsec_MfKQ9r8GKYqrTwjUPD8ILPZIo2LaLaSw";

// These were all sent from the server
const headers = {
"svix-id": "msg_p5jXN8AQM9LWM0D4loKWxJek",
"svix-timestamp": "1614265330",
"svix-signature": "v1,g0hM9SsE+OTPJTGt/tmIKtSyZlE3uFJELVlNIOLJ1OE=",
};
const payload = '{"test": 2432232314}';

const wh = new Webhook(secret);
// Throws on error, returns the verified content on success
const payload = wh.verify(payload, headers);
For more instructions and examples of how to verify signatures, check out their webhook verification documentation.
Retries
Svix attempts to deliver each webhook message based on a retry schedule with exponential backoff.
The schedule
Each message is attempted based on the following schedule, where each period is started following the failure of the preceding attempt:
- Immediately
- 5 seconds
- 5 minutes
- 30 minutes
- 2 hours
- 5 hours
- 10 hours
- 10 hours (in addition to the previous)
If an endpoint is removed or disabled delivery attempts to the endpoint will be disabled as well.
For example, an attempt that fails three times before eventually succeeding will be delivered roughly 35 minutes and 5 seconds following the first attempt.
Manual retries
You can also use the application portal to manually retry each message at any time, or automatically retry ("Recover") all failed messages starting from a given date.
Troubleshooting Tips
There are some common reasons why your webhook endpoint is failing:
Not using the raw payload body
This is the most common issue. When generating the signed content, we use the raw string body of the message payload.
If you convert JSON payloads into strings using methods like stringify, different implementations may produce different string representations of the JSON object, which can lead to discrepancies when verifying the signature. It's crucial to verify the payload exactly as it was sent, byte-for-byte or string-for-string, to ensure accurate verification.
Missing the secret key
From time to time we see people simple using the wrong secret key. Remember that keys are unique to endpoints.
Sending the wrong response codes
When we receive a response with a 2xx status code, we interpret that as a successful delivery even if you indicate a failure in the response payload. Make sure to use the right response status codes so we know when message are supposed to succeed vs fail.
Responses timing out
We will consider any message that fails to send a response within {timeout duration} a failed message. If your endpoint is also processing complicated workflows, it may timeout and result in failed messages.
We suggest having your endpoint simply receive the message and add it to a queue to be processed asynchronously so you can respond promptly and avoiding getting timed out.
Failure Recovery
Re-enable a disabled endpoint
If all attempts to a specific endpoint fail for a period of 5 days, the endpoint will be disabled. To re-enable a disabled endpoint, go to the webhook dashboard, find the endpoint from the list and select "Enable Endpoint".
Recovering/Resending failed messages
Why Replay
- If your service has downtime
- If your endpoint was misconfigured
If you want to replay a single event, you can find the message from the UI and click the options menu next to any of the attempts.
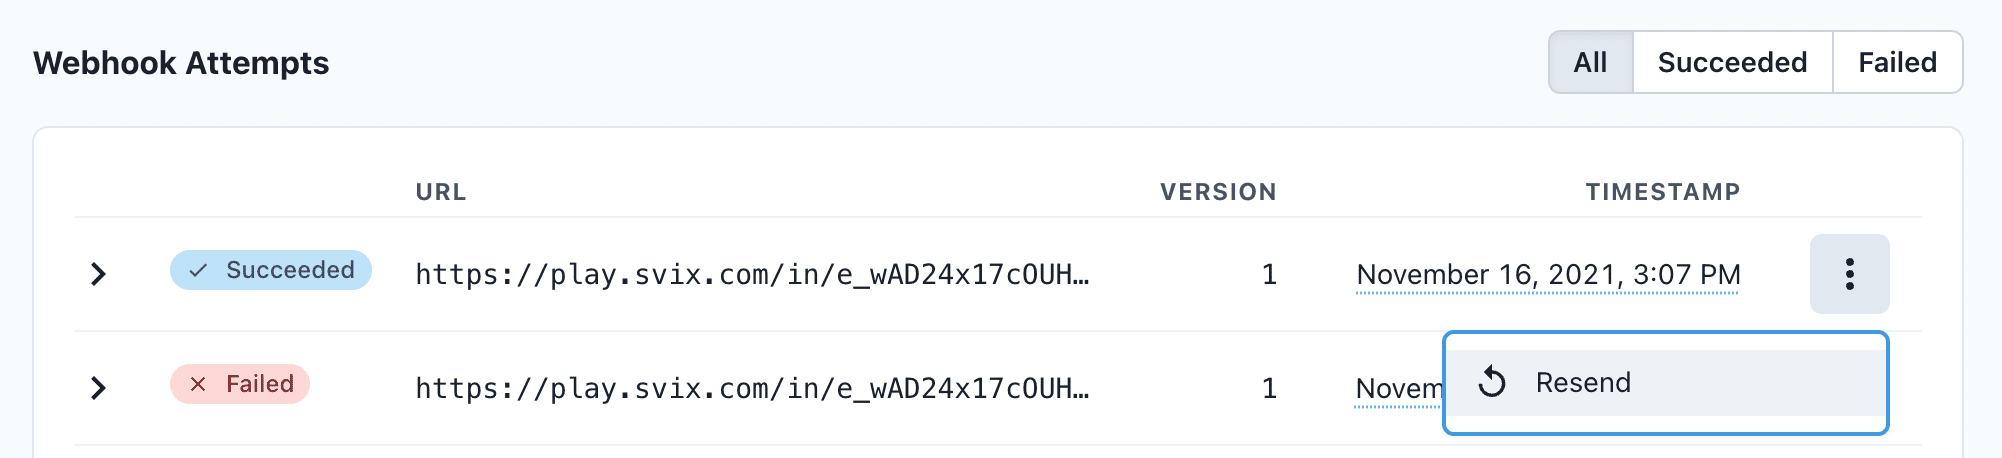
From there, click "resend" to have the same message send to your endpoint again.
If you need to recover from a service outage and want to replay all the events since a given time, you can do so from the Endpoint page. On an endpoint's details page, click Options > Recover Failed Messages.
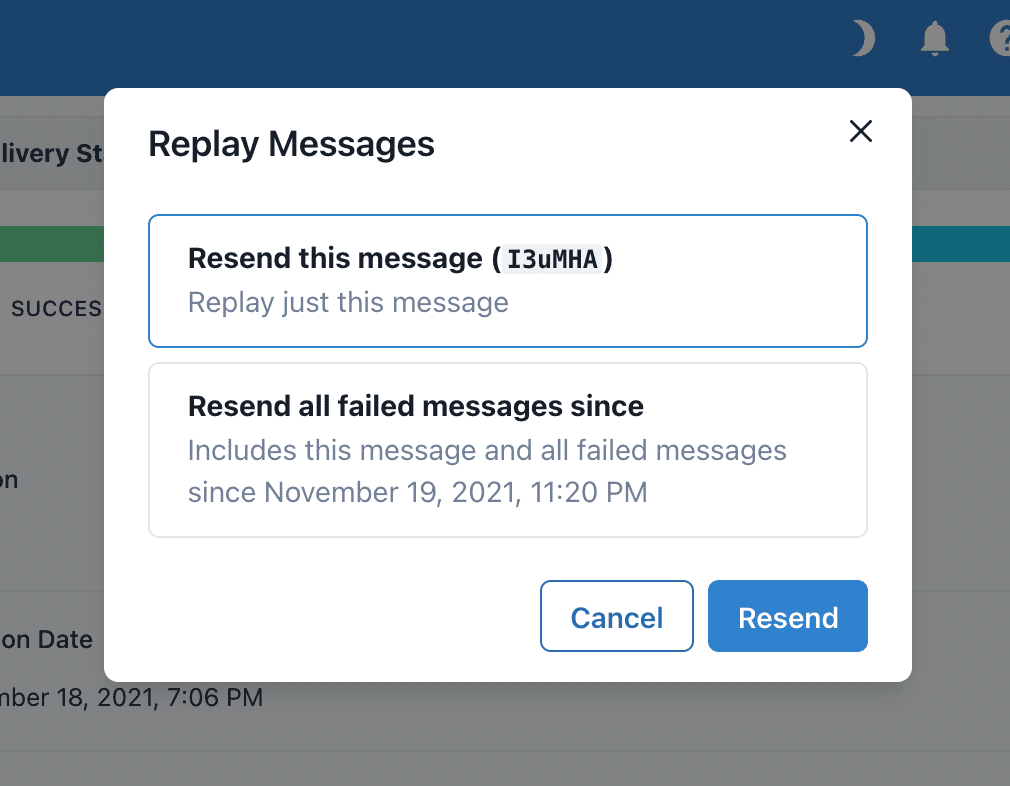
From there, you can choose a time window to recover from.
For a more granular recovery - for example, if you know the exact timestamp that you want to recover from - you can click the options menu on any message from the endpoint page. From there, you can click "Replay..." and choose to "Replay all failed messages since this time."
Updated 10 months ago